
Name Cheap – How to Change DNS For a DomainName
1) Point to Namecheap DNS servers
Changing the DNS for your domain is a straightforward process that involves the following steps:
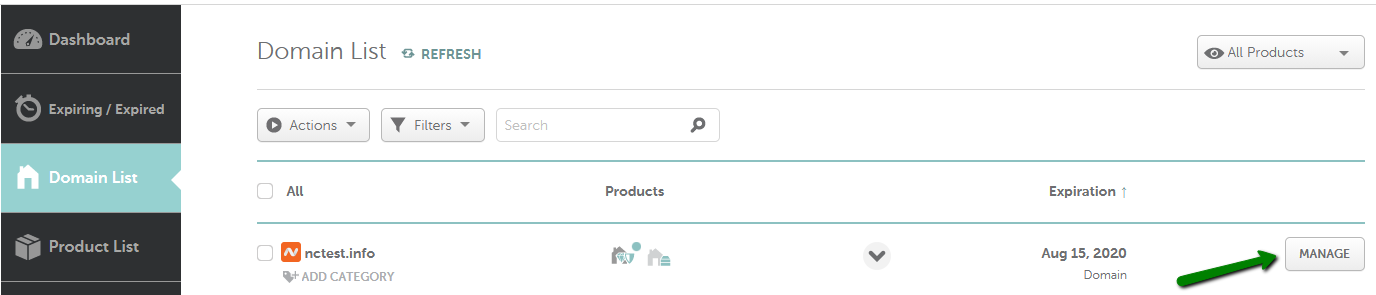
1. Log in to your Namecheap account.
2. From the left sidebar, select Domain List and click on the Manage button next to your domain:
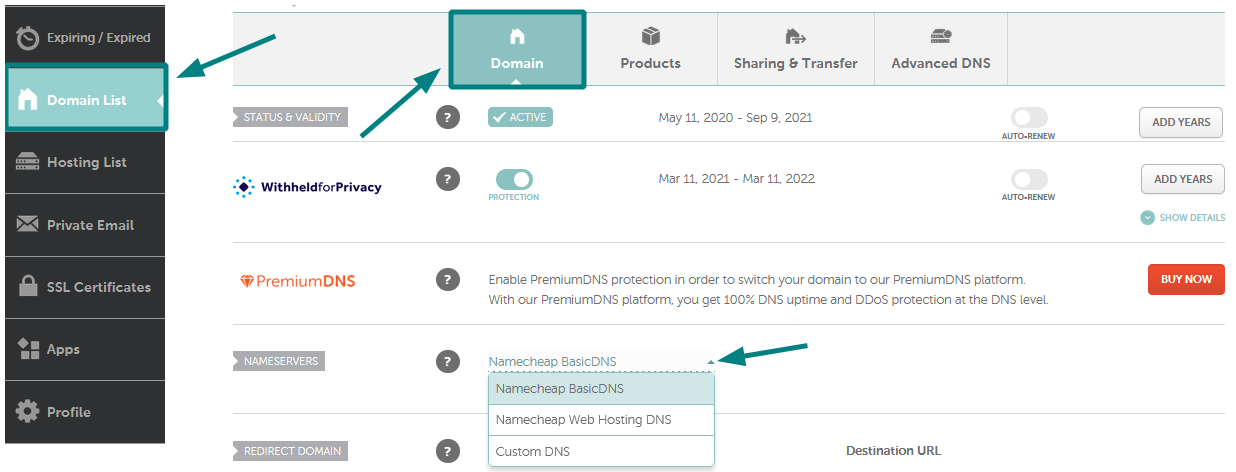
3. In the Nameservers section, select your preferred option from the drop-down menu and click on the green checkmark to save the changes:
NOTE: Nameservers are part of the Domain Name System (DNS) database that acts as a directory for devices and the IP addresses attached to them. When registering nameservers, an IP address is assigned to them, and unregistered nameservers cannot work correctly with some domains.
There are four options to choose from:
- Namecheap BasicDNS: If you want to point your domain to Namecheap’s default DNS, use the following nameservers:
- dns1.registrar-servers.com
- dns2.registrar-servers.com
- Namecheap Web Hosting DNS: Use this option if you have a Shared Hosting plan with Namecheap and want to point your domain to our hosting nameservers:
- dns1.namecheaphosting.com
- dns2.namecheaphosting.com
2) Point to your own DNS server (Plesk or CPanel)
- Login to your Name Cheap account
- Go to Domains List, go to the domain you want to change the NS records on, and select Manage.
- Go to the Advanced DNS Tab
- Go to the Personal DNS Server Section at the bottom, like you see below

- Head to Domains List, find the domain in the list.
- Click on Manage, advanced DNS tab, then go to the bottom to Personal DNS server.
- Click on add name server, In the “Custom Nameserver” box, click it, select ns1 and add the IP and hit Done.
- Do the same again, but use ns2, same or secondary IP address.
- Head back over to the Domain tab at the top
- Goto
- CustomDNS: If you want to point your domain to custom nameservers (for example, your Personal DNS servers or third-party hosting nameservers), fill in the nameservers provided by your hosting or third-party DNS provider and click on the green checkmark to save the changes:

NOTE:Enter the nameservers in the ns1.example.tld format. If you were provided with both the nameservers and IP addresses, only the nameservers should be inserted as custom nameservers.
NOTE: If you change nameservers from custom nameservers to Namecheap’s default ones or vice versa, the host records will not be added to the new nameservers automatically. Please make sure to save all the needed settings and set them up manually after the nameservers switch.
Nameservers changes do not propagate instantly. It may take up to 24 hours (more, in rare cases) for local ISPs to update their DNS caches so that everyone can see your website. You can always check your domain name using a proxy server as they do not store cache and will show non-cached information.
